Tuesday, September 30, 2008

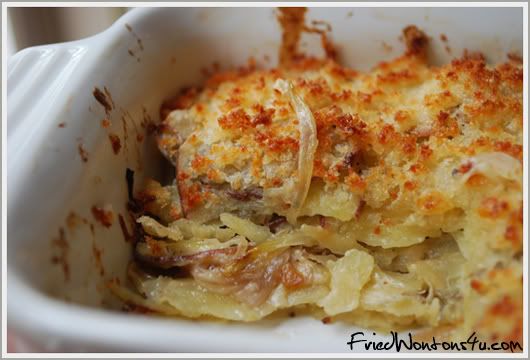
Japanese Sweet Potato Gratin with Aged Asiago Cheese: Adventures in Gluttony's Cheese of the Month Challenge

satsumaimo (Japanese sweet potato)

First things first, thank you so much to all those who commented on my Daring Bakers September Challenge post! It's always great hearing feedback and bravo to those who completed the challenge.

Besides the DB challenge this month, I was also excited about the Cheese of the Month Challenge over at Adventures in Gluttony. I love cheese and always willing to try something new, so this challenge sounded like a perfect way to explore my curiosity. If you're interested in participating for next month, head over to Adventures in Gluttony the first of every month for details. This month's chosen cheese is Asiago. I decided to use it in a gratin, but instead of with regular potato I tried it out with satsumaimo (Japanese sweet potato).


Japanese sweet potato can be found in most Asian supermarkets. Its skin is red and have a white flesh inside. This is not the same as the other Japanese sweet potato you might have heard about with the purple flesh inside that's popular in Okinawa and Hawaii. Satsumaimo are great for tempura and even more delicious simply just grilled. As for the Asiago, I went with the aged variety. I wasn't sure how well the sweetness of the potato would pair with the sharpness of the cheese, but I was in the mood for a gratin and this sounded like an interesting pairing.


I hardly make gratins and it's not because I don't like them. I actually love gratin. For goodness sake how could you not love melted baked cheese or baked breadcrumbs over anything! It's just that gratins always seem like a big family dish to me. Not only do I not have a big family to cook for, but my parents aren't the biggest fan of cheese. I'm slowly trying to ease my dad in with Swiss by adding a slice in his sandwiches every now and then, but mom...she's the tough one. Added shave slices of Parmigiano Reggiano in her salad. "It could have been better without the cheese" was her comment. Tucked a thin slice of provolone in her sandwich. Took one bite and put it down, but made her the exact sandwich a minute later minus the cheese and she ate the whole thing. I've even tried grating it on pasta and that was a no no. What really gets me is that she loves pizza though. This gratin would be my last attempt.


Japanese Sweet Potato Gratin with Aged Asiago Cheese


Ingredients
1 small Japanese sweet potato
1 small onion
Asiago cheese
1/3 cup of half and half
1 slice of white bread without the crust
2 tablespoon of butter
Salt and pepper


Preheat oven to 350 dgrees.

Chop the onion in half and slice. In a pan, add oil and caramelize the onion. Set aside.

Thinly slice the Japanese sweet potato. It doesn't need to be paper thin but do make sure it is evenly slice. You can take the skin off the potato if you like, but its' skin is thin and I think it looks nicer leaving it on.

Add 1 tablespoon of butter, 1/3 cup of half and half, salt and pepper in a pan. Cook until it's lightly simmering under low medium heat.

Add the slice Japanese sweet potato to the pan. Cook until it's tender but still has a bite to it or when the liquid has almost evaporated.

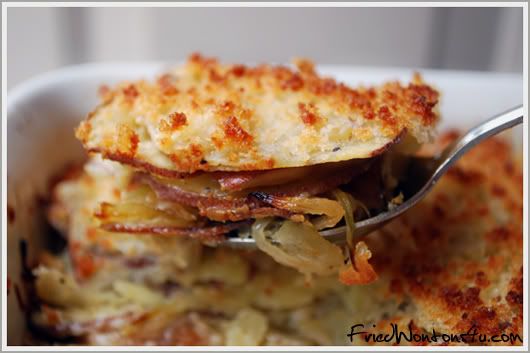
In a food processor. Pulse the white bread, about 2 tablespoons of grated Asiago cheese, and 1 tablespoon of melted butter together. This will be your breadcrumb topping.

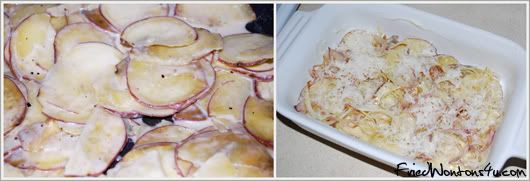
When the Japanese sweet potato is done, arrange an even layer in the bottom of a buttered 7x5 baking dish. Top it with the caramelize onion follow by grated Asiago cheese. Top that with another even layer of the potatoes and repeat with the onion and cheese topping. Top that with your last layer of potatoes.

Bake in the oven for about 15 minutes. Top it with the breadcrumb mixture during the last 3 minutes and bake until golden brown

Serves 2


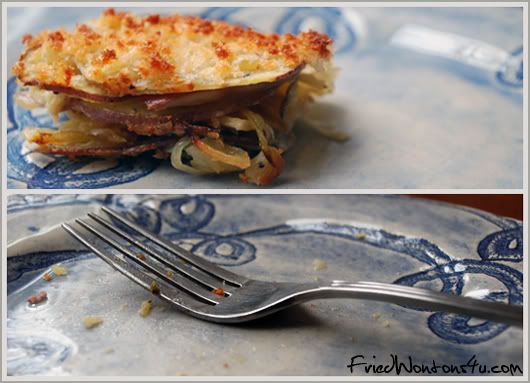
What's the verdict? She actually thought it was ok. I'm going take her "ok" comment as a nod that I should make this for Thanksgiving. I don't think I added enough grated Asiago cheese between the layer. I think I might try shredding the cheese next time. Also, I only used half and half because that was what I had in the fridge. I usually like the richer combo of milk and heavy cream instead in my gratins and would advice using that.

Do you have a favorite gratin dish? Any advice on converting non-cheese eaters?

Labels: , , , , ,

Saturday, September 27, 2008

Daring Bakers: Lavash Crackers & Toppings


Just in the nick of time! I was afraid I won't be able to complete September's Daring Bakers Challenge, but so glad I drag my jet lag body out of bed this late afternoon and got to work. This month's challenge was Lavash Crackers with Vegan Toppings. For the very first time the challenge was hosted by alternative Daring Bakers Natalie from Gluten A Go Go and co-hosted by Shel from Musings From the Fishbowl. Thank you ladies for the recipe! We were free to add our twist with different spices. I decided to put an Asian spin on mines and added soy sauce flavoring and a sprinkling of black sesame seed and dried nori.


This was my second Daring Bakers Challenge and although I believe the results for this one went a lot better than my first challenge, Chocolate Éclairs, once again I was baking in a rush. I didn't have time to do the dip I really wanted to do, Wasabi Hummus. I made a simple balsamic vinaigrette dip instead.


To add an Asian twist to the crackers, I added 2 tablespoons of soy sauce and 1 tablespoon of sesame oil instead of vegetable oil. As for the topping, I was deciding between dried nori and sesame seeds or dried shiso. I went with the nori and sesame seed instead thinking it would be a better companion for the wasabi hummus.


Although the soy sauce added a nice touch to the crackers, I probably needed to add 1/2 a tablespoon or maybe even an extra tablespoon more. The black sesame and nori topping went really well with each other. Too bad I didn't have time to make the wasabi hummus, but this is a recipe I would definitely be revisiting again.


Daring Barkers' September Challenge: Whole Wheat Lavash Crackers & Toppings

Makes 1 sheet pan of crackers

Ingredients:

1 1/2 cups all purpose wheat flour or gluten free flour blend (If you use a blend without xanthan gum, add 1 tsp xanthan or guar gum to the recipe)
1/2 tsp salt
1/2 tsp instant yeast
1 Tb sugar
1 Tb sesame oil
2 Tb soy sauce
1/3 to 1/2 cup + 2 Tb (3 to 4 oz) water, at room temperature
Black sesame
Dried nori flakes

1. In a mixing bowl, stir together the flour, salt yeast, sugar, oil, soy sauce, and just enough water to bring everything together into a ball. You may not need the full 1/2 cup + 2 Tb of water, but be prepared to use it all if needed.

2. For Non Gluten Free Cracker Dough: Sprinkle some flour on the counter and transfer the dough to the counter. Knead for about 10 minutes, or until the ingredients are evenly distributed. The dough should pass the windowpane test (see http://www.wikihow.com/Determine-if-Bre … ong-Enough for a discription of this) and register 77 degrees to 81 degrees Fahrenheit. The dough should be firmer than French bread dough, but not quite as firm as bagel dough (what I call medium-firm dough), satiny to the touch, not tacky, and supple enough to stretch when pulled. Lightly oil a bowl and transfer the dough to the bowl, rolling it around to coat it with oil. Cover the bowl with plastic wrap.

or

2. For Gluten Free Cracker Dough: The dough should be firmer than French bread dough, but not quite as firm as bagel dough (what I call medium-firm dough), and slightly tacky. Lightly oil a bowl and transfer the dough to the bowl, rolling it around to coat it with oil. Cover the bowl with plastic wrap.

3. Ferment at room temperature for 90 minutes, or until the dough doubles in size. (You can also retard the dough overnight in the refrigerator immediately after kneading or mixing).

4. For Non Gluten Free Cracker Dough: Mist the counter lightly with spray oil and transfer the dough to the counter. Press the dough into a square with your hand and dust the top of the dough lightly with flour. Roll it out with a rolling pin into a paper thin sheet about 15 inches by 12 inches. You may have to stop from time to time so that the gluten can relax. At these times, lift the dough from the counter and wave it a little, and then lay it back down. Cover it with a towel or plastic wrap while it relaxes. When it is the desired thinness, let the dough relax for 5 minutes. Line a sheet pan with baking parchment. Carefully lift the sheet of dough and lay it on the parchment. If it overlaps the edge of the pan, snip off the excess with scissors.

or

4. For Gluten Free Cracker Dough: Lay out two sheets of parchment paper. Divide the cracker dough in half and then sandwich the dough between the two sheets of parchment. Roll out the dough until it is a paper thin sheet about 15 inches by 12 inches. Slowly peel away the top layer of parchment paper. Then set the bottom layer of parchment paper with the cracker dough on it onto a baking sheet.

5. Preheat the oven to 350 degrees Fahrenheit with the oven rack on the middle shelf. Mist the top of the dough with water and sprinkle a covering of black sesame seeds and dried nori. Be careful with spices and salt - a little goes a long way. If you want to precut the cracker, use a pizza cutter (rolling blade) and cut diamonds or rectangles in the dough. You do not need to separate the pieces, as they will snap apart after baking. If you want to make shards, bake the sheet of dough without cutting it first.

5. Bake for 15 to 20 minutes, or until the crackers begin to brown evenly across the top (the time will depend on how thinly and evenly you rolled the dough).

6. When the crackers are baked, remove the pan from the oven and let them cool in the pan for about 10 minutes. You can then snap them apart or snap off shards and serve.


Labels: , , , ,

Wednesday, September 24, 2008

Instant Comfort


After spending a total of 16hrs in the air, 14hrs total waiting to fly in 3 different airports, and 2 connection flights, I was freaking HUNGRY for some homemade cooking that would require as less effort as possible. Egg Sandwich and Cream Corn Soup was the answer.

The soup and sandwich combo. What is there not to love about it. It's the perfect lunch, the perfect breakfast, and the perfect dinner. Add a small side salad and it gets even better. After a long flight, I needed something to help me forget about crappy economy class meals and rip of airport food. Although I did had a pretty good experience with French Macrons at Narita International Airport's Starbucks in Japan, but that's for another post. I need some home cooking, but jet lagged and a knife is not a good idea.


At times like these instant food is the way to go. One of my favorites are instant soups from Knorr. They come in a variety of flavors including spinach, mushroom, squash, potato, corn, and tomato. One small package usually contains 4 servings and each servings are individually wrapped. Just pour out the contents and add 150ml of hot boiling water. Mix and instant comfort! Hmmm...but something was missing and before I started pouring the hot water I knew I needed something else. Egg sandwich! When I was in Japan I was really craving this egg sandwich I had the last time I was there, but sadly I couldn't find it this time around. Usually found in supermarkets or convenient stores, they are wrap up in a package and contain two slices of white crust less bread sandwich between a simple mixture of egg, mayonnaise, and mustard. The slices of bread are somehow press together in a way that the sides are sealed up. Such a simple sandwich and that was exactly what I needed.


Simple Egg Sanwich

Ingredients:
Two eggs
2 slices of crust less white bread
Kewpie mayonnaise
Mustard
Salt

Hard boiled the eggs and let it cool before dicing.
In a bowl add dice eggs, Kewpie mayonnaise, and mustard.
Mix and taste.
Add salt if desire.
Spread mixture onto the white crust less bread.
Put the other piece on top and enjoy.
Makes two sandwiches


I tried to sealed up the slices of bread together but it just didn't work. Need to figure that part out next time. It's a bitter sweet feeling coming back home, and although a sandwich and a soup can't change that, it was good to know simple food can always bring a little comfort. Going to rest up a bit before posting all the amazing food I got to eat while in Japan. Stay tune!


What is your favorite quick comfort food?

Labels: , , ,

Saturday, September 6, 2008

Lunch time in Japan

Konnichiwa and hello from Japan! After 3 flights and 1 bus ride, I am in Himeji. Located in the Hyogo prefecture and in the Kansai region of Japan, Himeji is best known for its castle, the Himeji Castle or also known as the White Heron Castle. I'll be staying here for a few days and then it's off to Osaka and Kobe, which are both near by, follow by Tokyo and Okinawa. Although my stay in Japan this time will be brief, about 2.5wks, compare to my 2.5months 3yrs ago, I can't wait to visit all the places I've been before and the new ones I've yet to seen. Now on to the food!

So what to eat and where do I begin! Udon? Ramen? Okonomiyaki? Curry? I know, I'm going to start alphabetically. A is for Akashiyaki. Similar to the more popular takoyaki, akashiyaki are fluffy round balls filled with small pieces of octopus inside. Dip in a dashi broth before eating, these little round treats were exactly what I was craving for. At ¥390, less than $4, I had enough for dessert which unfortunately was not all that great. I just had to try the miso flavor soft yogurt didn't I. =(

Sent from my iPhone

Labels: